
Creating a Telescoping View in the Planning Book
Executive Summary
- Planning books in APO can be configured to a telescope, which means that they have different buckets in the near term rather than the longer term.
- To accomplish this, we show how to create the Time Bucket Profile and set the basic and display periodicity interval and the interval number along with other details of the configuration of this capability.
Introduction
It is a frequent request from different clients to provide a telescoping view of the Planning Book. A telescoping planning book means that they want to see the Planning Book in days, then in weeks, and then in months, and they want to specify how many periods they would like to show each (7 days, 14 weeks, 16 months, etc.).
How to Create the Telescoping Planning Book
To do this, it’s necessary to perform the configuration of the Time Bucket Setting. Unfortunately, SAP does not ship with a standard telescoping Time Bucket Setting. Therefore it must be created anew for each company during implementation. It’s a bit confusing to set, but once an example is shown, it is simple.
The following steps for creating the Time Bucket Setting were explained to me first by Ralph Brown. Ralph is an experienced SAP consultant who works both in SCM and in MM.
Create the Time Bucket Profile
To create this custom Time Bucket Profile, go to the IMG by typing in SPRO into the transaction box.
The transaction is /N/SAPAPO/MSDP_ADMIN
![]() To configure the Time Buckets Profile to be telescoping, it’s necessary to add multiple line items. Secondly, you can change the number of periods you want to appear by changing the number column.
To configure the Time Buckets Profile to be telescoping, it’s necessary to add multiple line items. Secondly, you can change the number of periods you want to appear by changing the number column.
Setting the Basic and Display Periodicity Interval and Interval Number
In this case, there are 12 weeks shown, but we could change it to whatever number of weeks we want by altering this field.
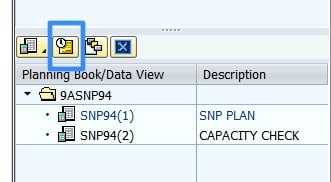
 To apply this Time Bucket Profile to the Planning Book, we need to first get to the Planning Book (The transaction changes depending upon which you want to add it to. In this case, we will go to the transaction /N/SAPAPO/SNP94). To select the Time Bucket Profile button, a yellow square with a clock in the upper left corner.
 Next, you want to select the Current Settings dialog button.
The Current Settings
 Then you can select the TB Profile that you want to apply to the Planning Book. After you open the Planning Book, it will show the time buckets along the top in precisely the periodicity and the number of periods per periodicity that you specified in the Time Bucket Profile.